Github API - Integration

In modern software development, leveraging APIs is crucial for integrating various functionalities into your projects. GitHub, being a popular platform for version control and collaboration, provides a powerful API that allows developers to interact with repositories, issues, pull requests, and much more programmatically. In this tutorial, we&asap;ll walk through the process of integrating the GitHub API into your project using Python. We&asap;ll cover authentication, making requests, and handling responses.

Lets Get Started

Generate Personal Access Token:

  1. Go to your GitHub account settings.
  2. Navigate to Developer settings -> Personal access tokens -> Tokens (classic).
  3. Click on  "Generate new token"  -> Generate new token (classic).
  4. Give your token a description and select the appropriate scopes (permissions).
  5. Click "Generate token" and copy the generated token.
Note: Treat this token like a password and keep it secure.

I have selected the following read permissions only to view them public on my portfolio.

permission 1permission 2permission 3

Save your github username and token inside .env file.

Add your github username and token in .env

GITHUB_USERNAME=<username_here>
GITHUB_SECRET_TOKEN=<github_token_here>

About Github REST API

You can use GitHub's API to build scripts and applications that automate processes, integrate with GitHub, and extend GitHub. For example, you could use the API to triage issues, build an analytics dashboard, or manage releases.

In this blog we are going to integrate the only API which can we show public like repositories, your profile details and more.

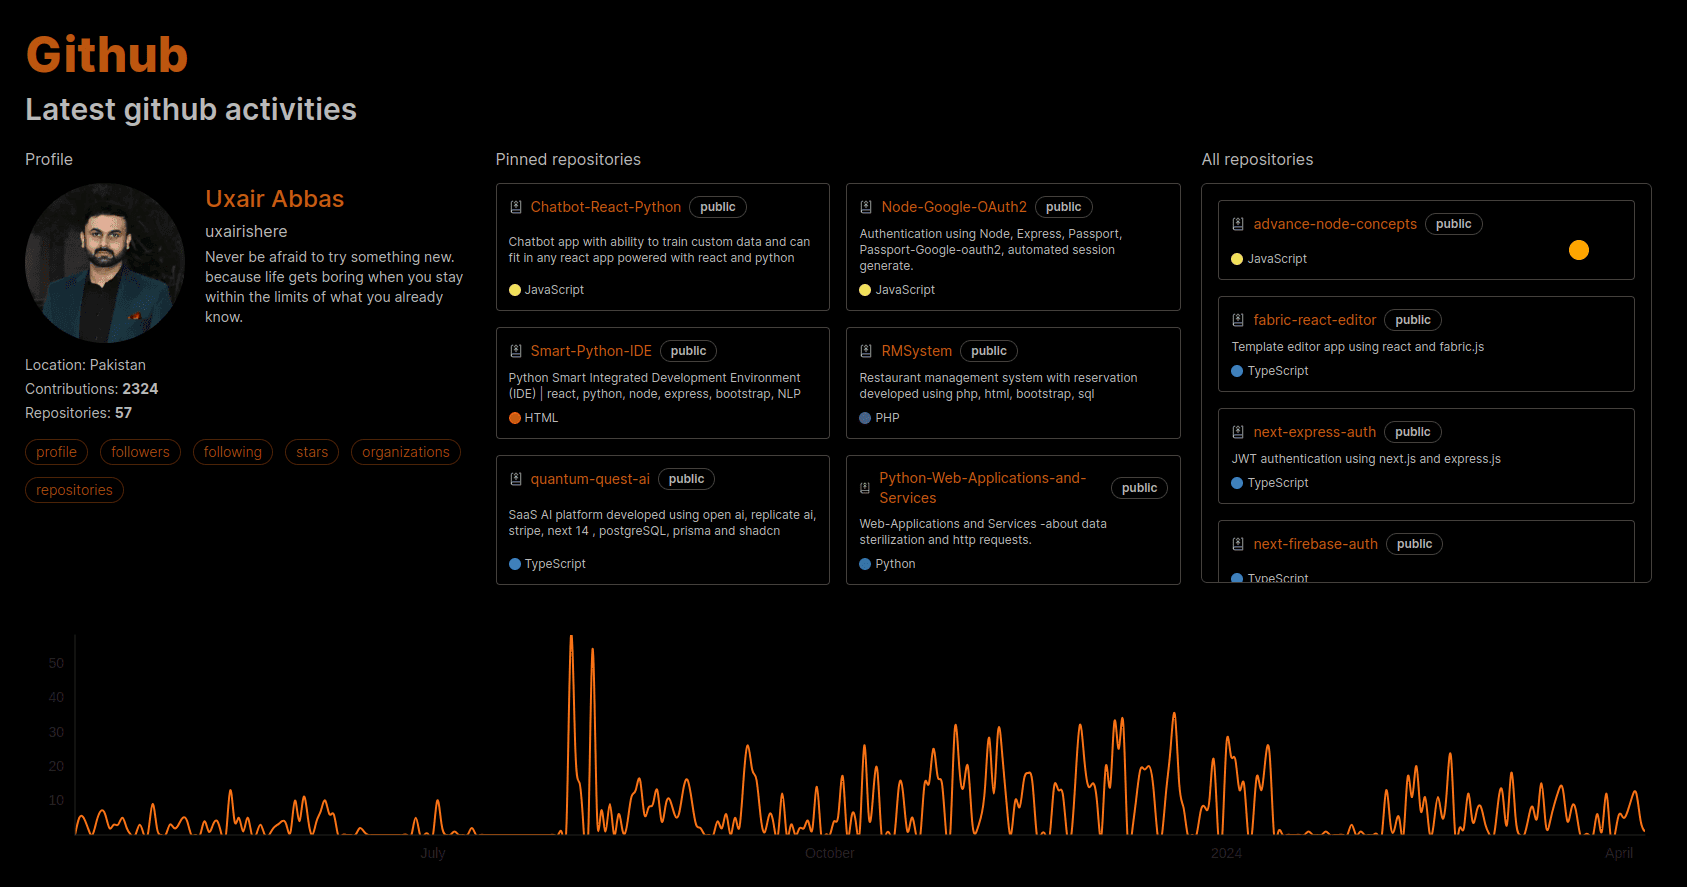
Pinned repositories

Lets fetch our pinned repositories first

Replace the " quotations with ` backticks and also replace greater than and less than signs with $ querly braces


const fetchPinnedRepos = async () => {
    try {
        const response = await fetch("https://api.github.com/users/<process.env.GITHUB_USERNAME>/repos?type=owner&sort=updated&direction=desc",
            {
                headers: {
                    'Authorization': "bearer <process.env.GITHUB_SECRET_TOKEN>",
                },
            });
        if (!response.ok) return {};

        const data = await response.json();
        // Assuming you have less than 6 pinned repos
        return { pinnedRepos: data.slice(0, 6), otherRepos: data.slice(6), status: 200 };

    } catch (error) {
        console.error('Error fetching pinned repositories:', error);
        return {};
    }
};

Save response inside a state to render to on jsx element.

Profile details

Now fetch github profile details

Replace the " quotations with ` backticks and also replace greater than and less than signs with $ querly braces


const fetchUserDetails = async () => {
    try {
        const response = await fetch('https://api.github.com/users/<process.env.GITHUB_USERNAME>',
            {
                headers: {
                    'Authorization': 'bearer <process.env.GITHUB_SECRET_TOKEN>',
                },
            });
        if (!response.ok) return null;

        const data = await response.json();
        // Assuming you have less than 6 pinned repos
        return data;

    } catch (error) {
        console.error('Error fetching pinned repositories:', error);
        return null;
    }
};

Save response inside a state to render to on jsx element.

Contributions

Last but not least lets fetch github contributions

Replace the " quotations with ` backticks and also replace greater than and less than signs with $ querly braces

Here I'm using graphql query which I will explain below the code snippet.
The query retrieves data about the user's name and contributions, including their total contributions and contribution calendar details.


const fetchContributions = async () => {
    try {
        const response = await fetch('https://api.github.com/graphql',
            {
                method: 'POST',
                body: JSON.stringify({
                    query: 'query {
                                user(login: <process.env.GITHUB_USERNAME>) {
                                    name
                                    contributionsCollection {
                                        contributionCalendar {
                                            totalContributions
                                            weeks {
                                                contributionDays {
                                                    contributionCount
                                                        date
                                                }
                                            }
                                        }
                                    }
                                }
                            }',
                }),
                headers: {
                    'Authorization': 'bearer <process.env.GITHUB_SECRET_TOKEN>',
                },
            });
        if (!response.ok) return null;

        const data = await response.json();

        return data;

    } catch (error) {
        console.error('Error fetching contributions:', error);
        return null;
    }
};

Save response inside a state to render to on jsx element.

Overview of GraphQL

  • GraphQL is a query language for APIs developed by Facebook. It allows clients to request only the data they need, in a single query, from a GraphQL server.
  • Unlike REST APIs, where clients often receive fixed data structures, GraphQL APIs allow clients to specify the shape and structure of the data they require.
  • GraphQL provides a more efficient and flexible way to retrieve and manipulate data, making it particularly useful for applications with complex data requirements or multiple data sources.

Why GraphQL is Used Here

  • In this code, GraphQL is used to fetch contribution data from the GitHub API.
  • GraphQL allows the query to be tailored precisely to the data needed, reducing over-fetching and under-fetching of data compared to traditional REST APIs.
  • By using GraphQL, the code can efficiently retrieve specific contribution details for the user, including their total contributions and contribution calendar, in a single request.
  • The form of data we are retrieving will make it easier to render it on a chart.

Destructuring the response

Lets destructure our data recieved from our pinnded, profile and contributions requests


const { pinnedRepos, otherRepos, status } = await fetchPinnedRepos();
    const contributions = await fetchContributions();
    
    const user = await fetchUserDetails();

    const linksList = linksData(user);

    const { data: { user: { contributionsCollection: { contributionCalendar: { totalContributions, weeks } } } } } = contributions;

    const contributionDays = weeks.reduce(((prev: any, cur: any) => {
        return prev.concat(cur.contributionDays)
    }), [])

linksData


export const linksData = (user: any) => [
    { name: 'profile', url: user.html_url },
    { name: 'followers', url: user.followers_url },
    { name: 'following', url: user.following_url },
    { name: 'stars', url: user.starred_url },
    { name: 'organizations', url: user.organizations_url },
    { name: 'repositories', url: user.repos_url },
]

Congrats

You have successfuly implemented the diffucult part.

When it comes to HTML and styling, I trust your expertise to create something truly user-friendly and amazing. Feel free to use your creativity and the information you have to make it shine!

Look what I have came up with
poster image